
Welcome to AgentTaxPackage™
Everything you need to understand AgentTaxPackage™—one screen at a time.
Dashboard
What is this screen?
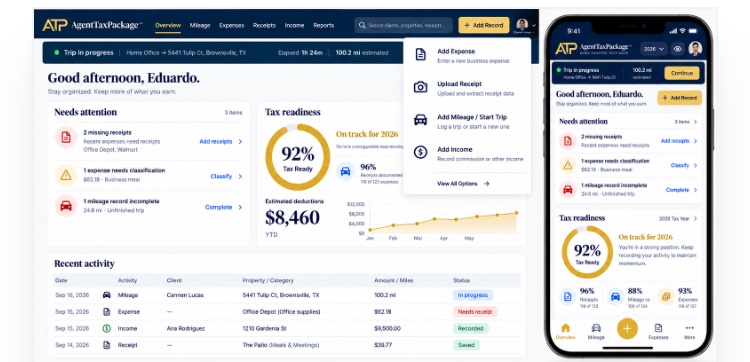
The Dashboard is the first screen you land on. At the top is the AgentTaxPackage™ banner, then a green Stay Tax Ready strip showing your Tax Readiness percentage, and below that a grid of tiles for the tax year you're in — Gross Commission, Net Commission, Deductible Expenses, Marketing Spend, Mileage Deduction, Estimated Net Income, Recommended Tax Reserve, Miles This Month, Receipt Completion and more. At the bottom you'll see Top Properties by Mileage and Recent Expenses.
Why would I use it?
Every time you sign in. Thirty seconds here tells you what your year looks like so far and whether anything needs your attention.
Click the screenshot to enlargeTap the screenshot to enlarge
 Click to enlarge12345
- 1Navigation Menu
- 2Stay Tax Ready
- 3Quick Actions
- 4Dashboard Summary tiles
- 5Recent Expenses
What should I do first?
Check the Tax Year selector at the top of the screen is showing the year you're working in, then read the Stay Tax Ready strip.
What can I ignore if I'm brand new?
The Recommended Tax Reserve, Vehicle-overlap wording and Estimated Net Income tiles. They fill in on their own once you've entered a few things — they're for your accountant to interpret, not for you to act on today.
How does it work?
- The dark sidebar on the left is your menu: Dashboard, Daily Close, Expenses, Mileage, Income, Receipt Center, Properties, Vendors, Funding, Reports and Settings.
- The Tax Year dropdown at the top right controls every number on the page.
- Add Expense and Add Income sit at the top right of the Dashboard heading — the two fastest ways to record something.
- Hide financials blanks out the dollar amounts if someone is looking over your shoulder.
- Nothing on this screen changes your records. It's a read-only snapshot.
Pro Tip
Make the Dashboard part of your morning routine. A quick look each day is far easier than sorting out a month of catch-up later.
Dashboard Quick Reference PDF
One-page overview of every tile
Click the screenshot to enlargeTap the screenshot to enlarge
Click to enlarge12345- 1Navigation Menu
- 2Stay Tax Ready
- 3Quick Actions
- 4Dashboard Summary tiles
- 5Recent Expenses
Daily Close™
What is this screen?
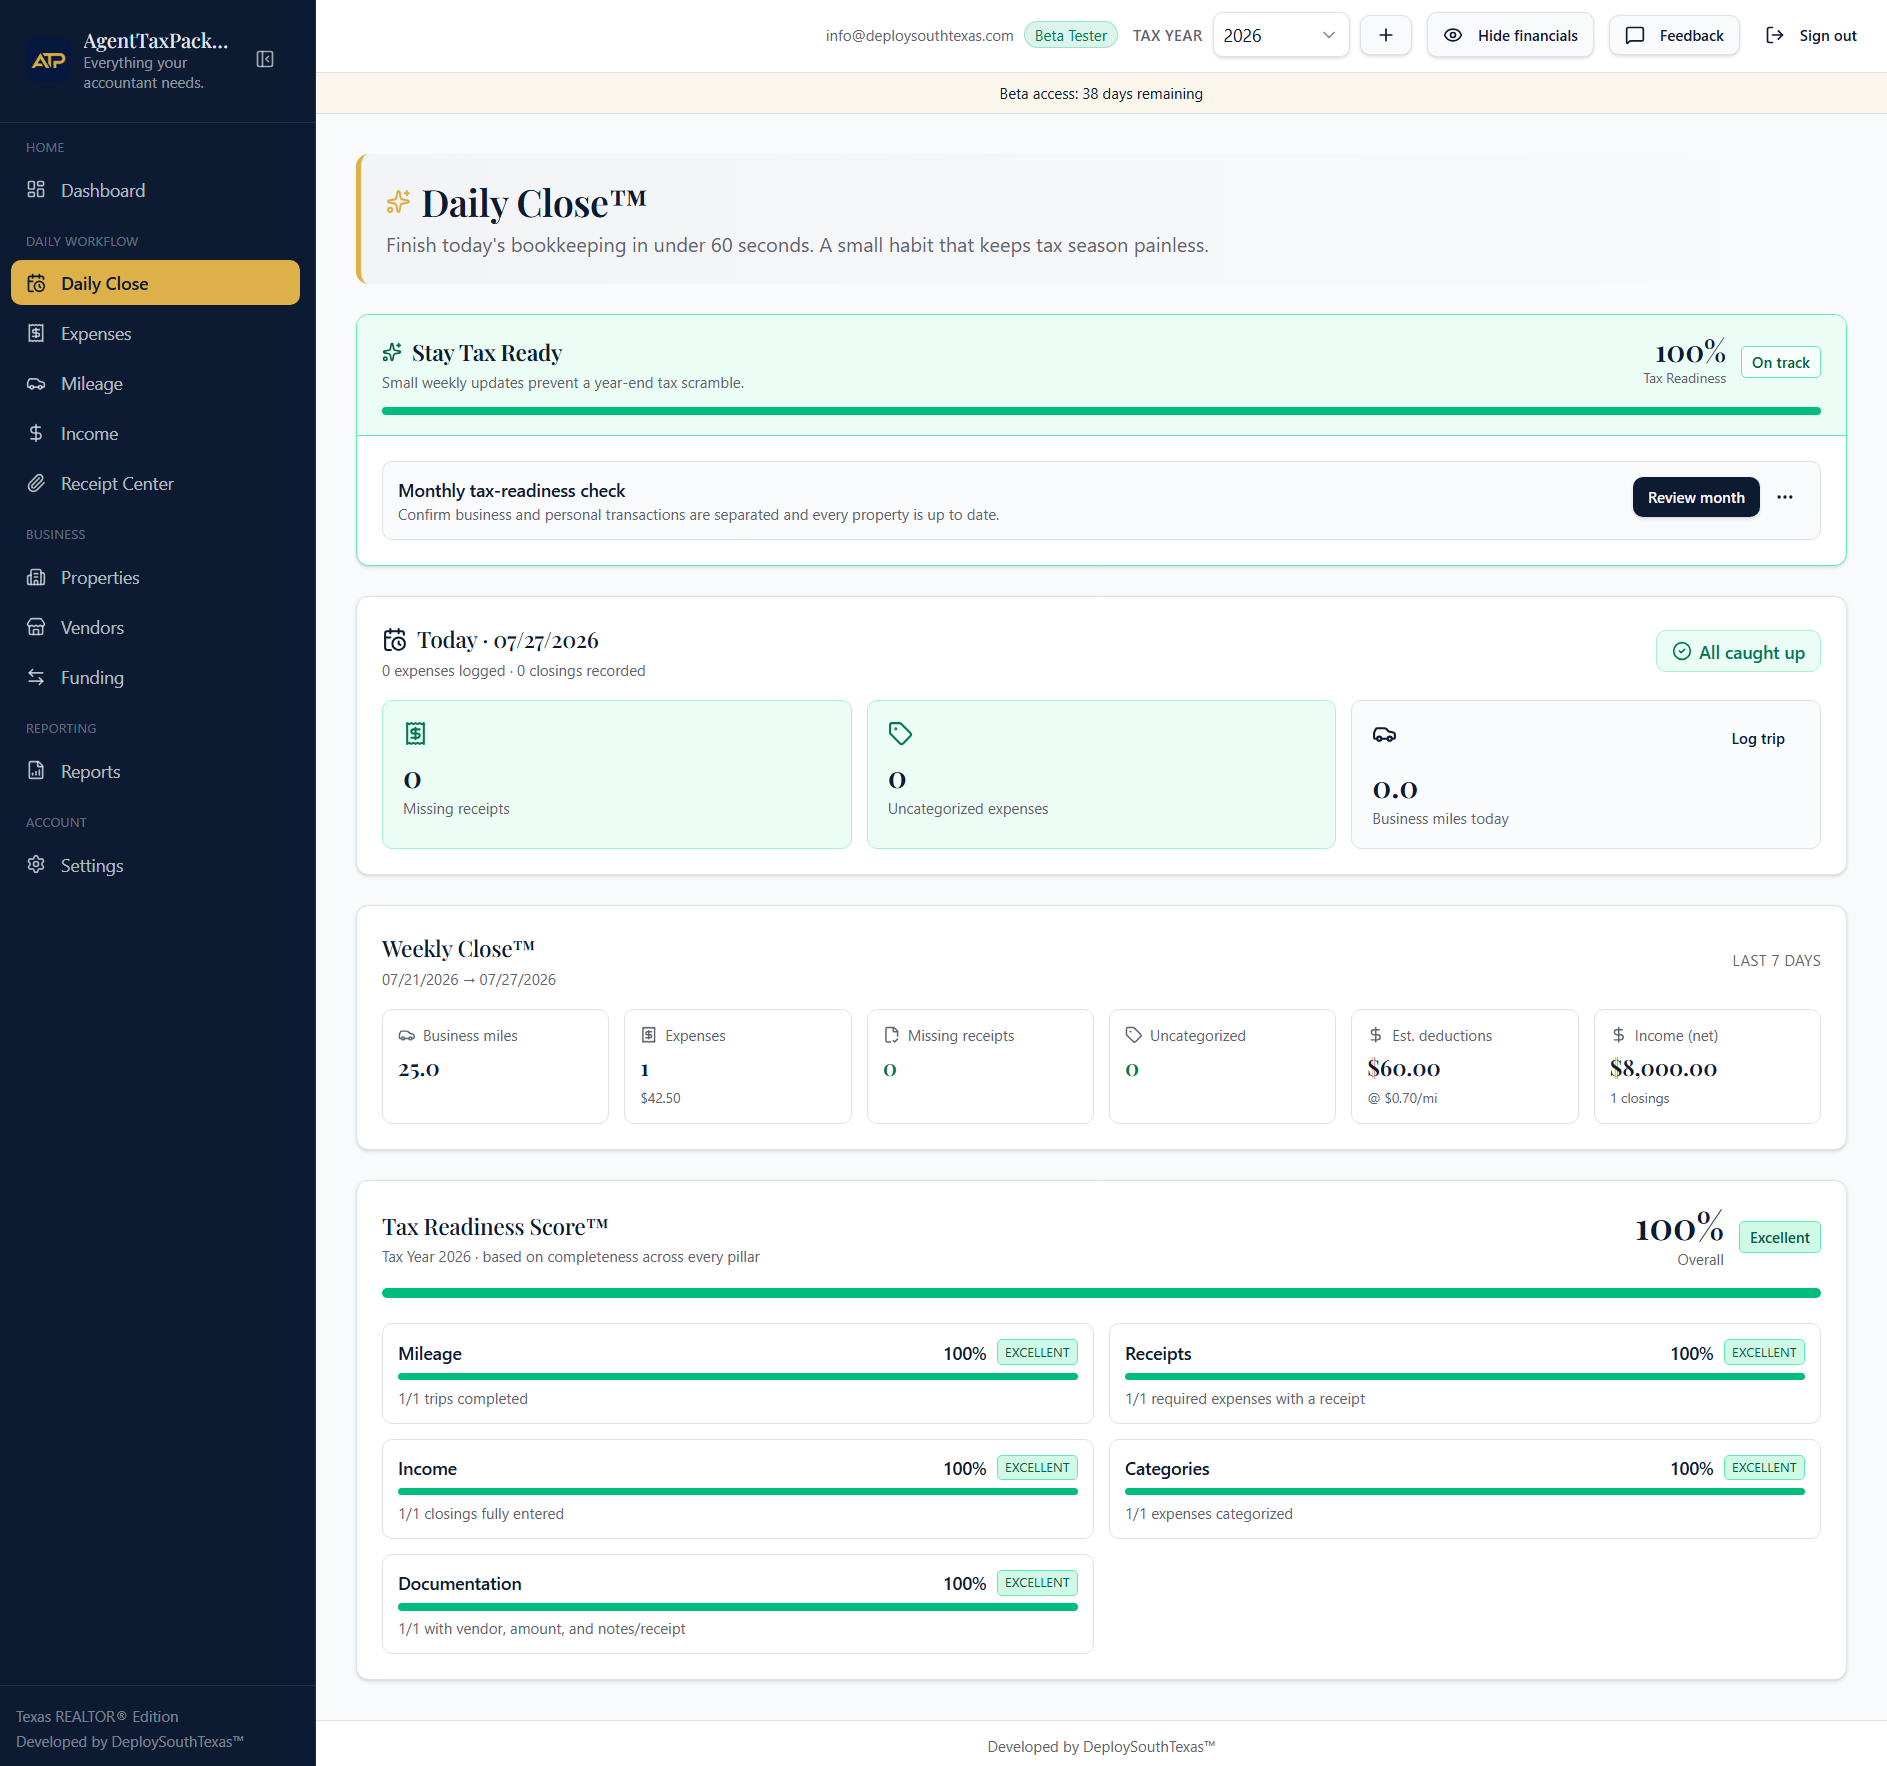
Daily Close™ finishes today's bookkeeping in under 60 seconds. The screen shows today's date with counts for missing receipts, uncategorized expenses and business miles today, then Weekly Close™ covering the last 7 days, and finally your Tax Readiness Score™ broken into Mileage, Receipts, Income, Categories and Documentation.
Why would I use it?
At the end of a working day, or the next morning if that suits you better. It takes a couple of minutes.
Click the screenshot to enlargeTap the screenshot to enlarge
 Click to enlarge1234
- 1Stay Tax Ready
- 2Today's activity
- 3Weekly Close™
- 4Tax Readiness Score™
What should I do first?
Look at the Today card. If it says All caught up, you're done — close the laptop.
What can I ignore if I'm brand new?
The five pillar bars in the Tax Readiness Score™. They'll sit at 0% until you've recorded something, and that's completely normal on day one.
How does it work?
- The Today card shows Missing receipts, Uncategorized expenses and Business miles today.
- Log trip in the corner of the miles card takes you straight to Mileage if you forgot a drive.
- Weekly Close™ shows the same information across the last 7 days, plus estimated deductions and net income.
- Tax Readiness Score™ scores completeness across five pillars and labels each one Excellent, or lower if something is missing.
- Skip a day and nothing is lost — the numbers simply carry forward.
Pro Tip
Consistency beats perfection. Two minutes at the end of each day keeps your records clean without ever feeling like bookkeeping.
Click the screenshot to enlargeTap the screenshot to enlarge
Click to enlarge1234- 1Stay Tax Ready
- 2Today's activity
- 3Weekly Close™
- 4Tax Readiness Score™
Expenses
What is this screen?
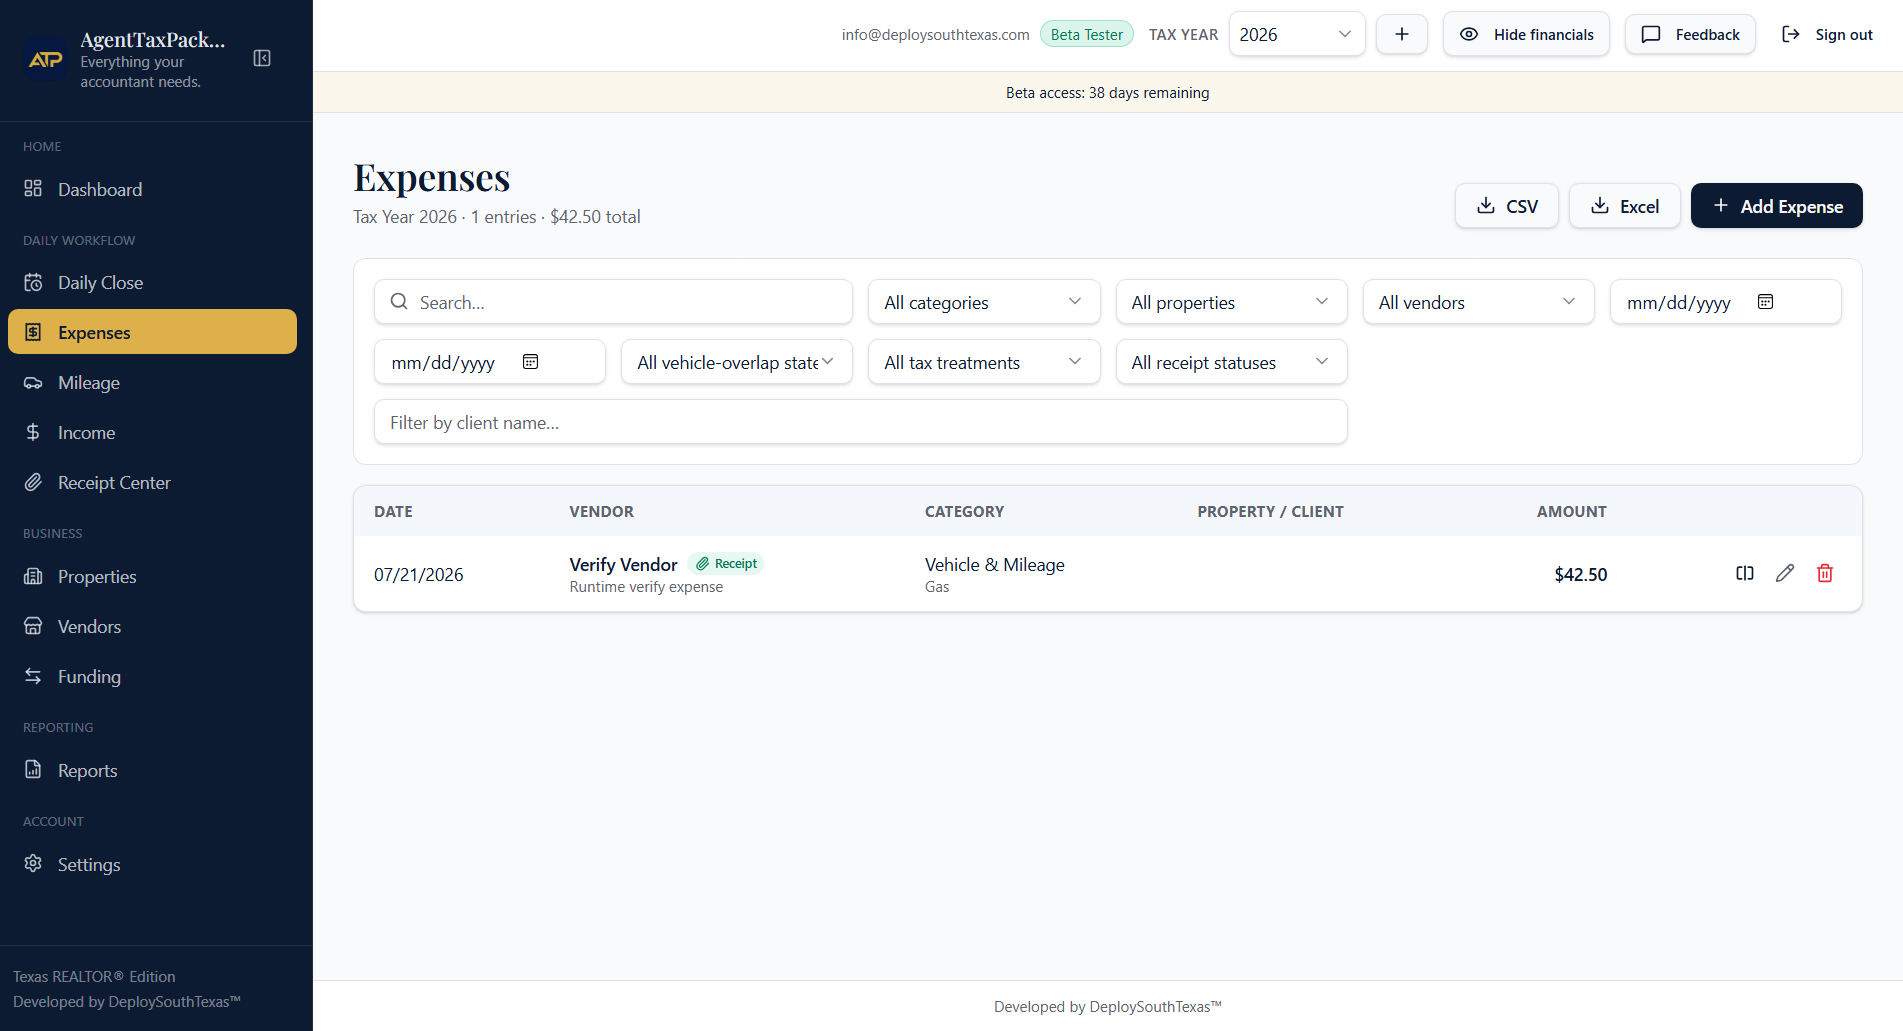
Expenses is the list of everything you've spent on the business this tax year. The heading tells you the year, how many entries you have and the total. Below that is a row of filters, and then a table with Date, Vendor, Category, Property / Client and Amount, with edit and delete icons on the right of every row.
Why would I use it?
Any time you spend money on your business. Recording it right when it happens takes about fifteen seconds.
Click the screenshot to enlargeTap the screenshot to enlarge
 Click to enlarge1234
- 1Add Expense
- 2Filters
- 3Expense list
- 4Edit / delete
What should I do first?
Press + Add Expense at the top right and enter one purchase you already remember.
What can I ignore if I'm brand new?
The vehicle-overlap and tax treatment filters. Those exist for your accountant at year-end; you don't need them to record a purchase.
How does it work?
- + Add Expense opens the entry form for a new purchase.
- Fill in the date, the vendor, a category and the amount.
- Attach a receipt so the row shows a green Receipt tag.
- Connect the expense to a property or client when it belongs to one.
- Use the search box and the All categories, All properties, All vendors and date filters to find an entry later.
- The pencil icon edits a row and the trash icon deletes it.
- Split Business & Personal: If an expense contains both business and personal purchases on the same receipt, use the Split Business & Personal icon located next to the Edit button. This feature allows you to allocate one receipt across multiple business and personal categories while keeping everything connected to the original purchase. Save the expense first, then use Split Business & Personal whenever a receipt contains more than one type of purchase.
- CSV and Excel export whatever you're currently looking at.
Next Step
Mixed business and personal purchases? After saving an expense, you can use the Split Business & Personal feature to allocate one receipt across multiple categories without re-entering the purchase.
Learn more in the Split Business & Personal Help section.
Pro Tip
Use the same category for the same kind of purchase every time. Consistent categories make your year-end totals meaningful.
Expense Checklist PDF
Common REALTOR® and builder expenses
Click the screenshot to enlargeTap the screenshot to enlarge
Click to enlarge1234- 1Add Expense
- 2Filters
- 3Expense list
- 4Edit / delete
Mileage
What is this screen?
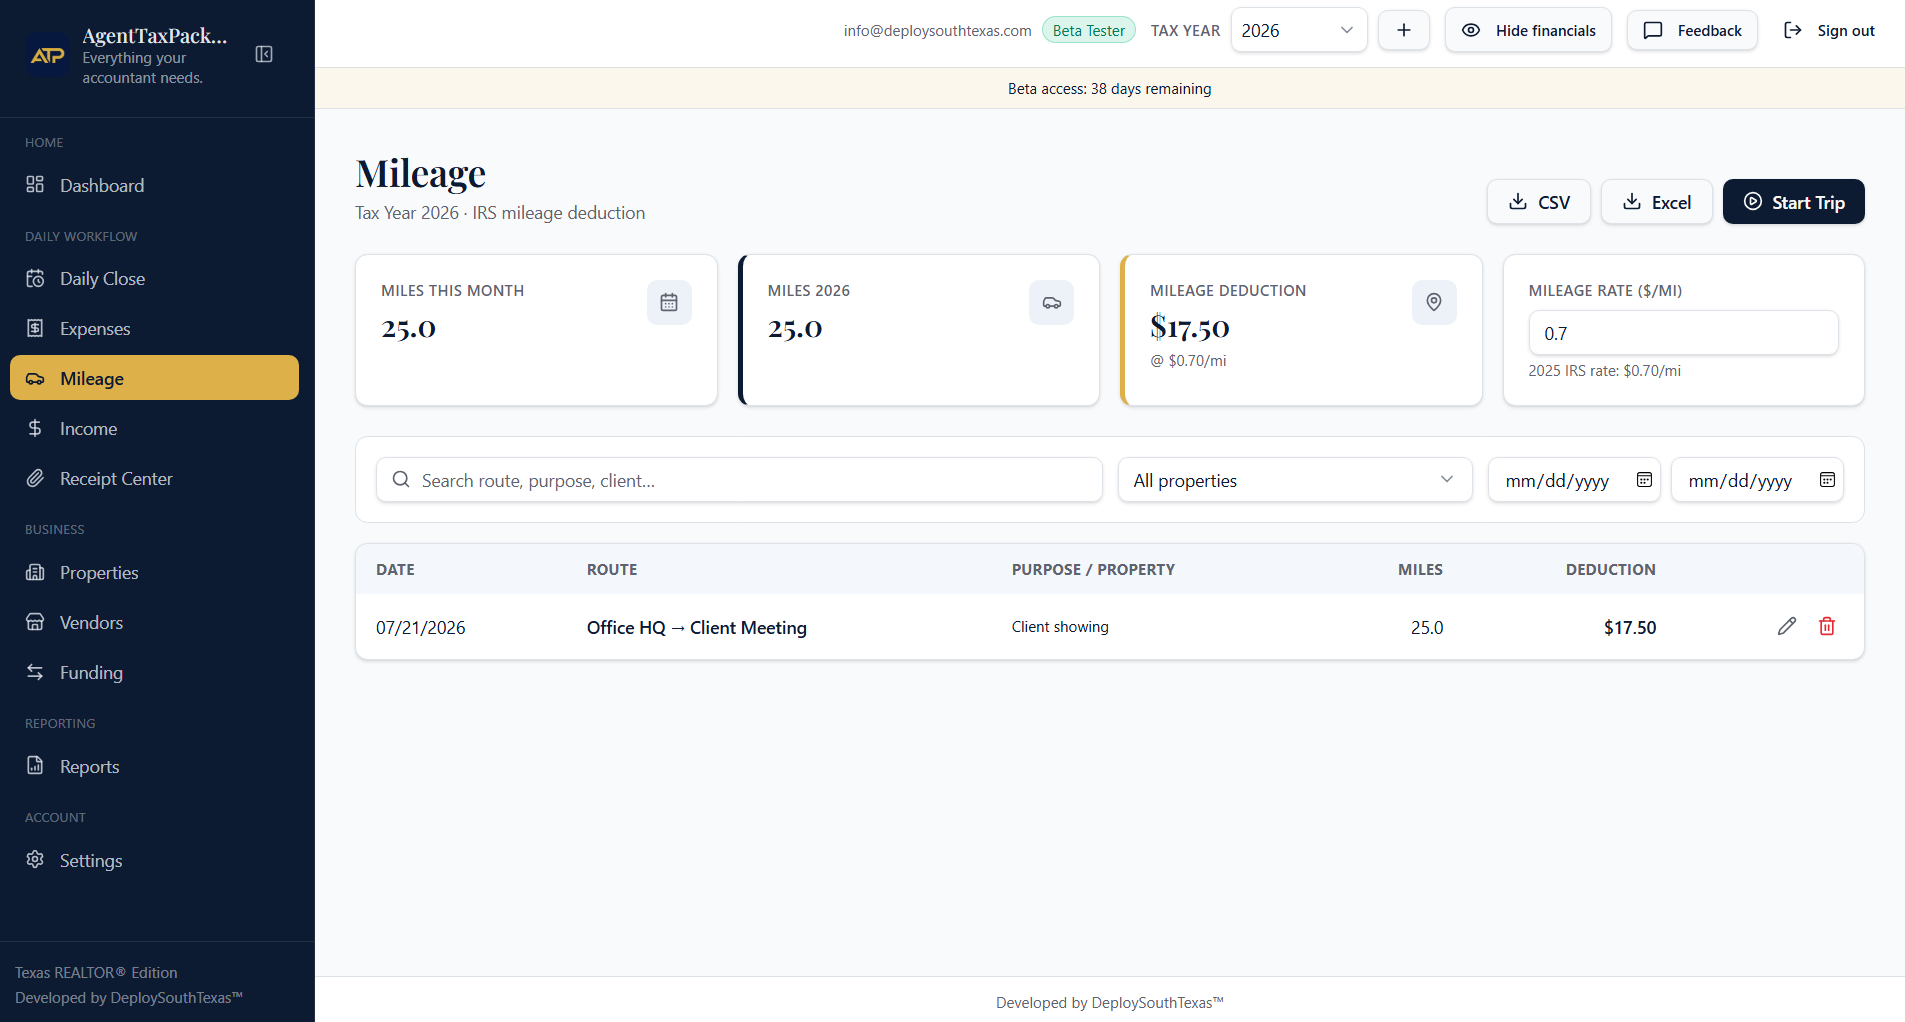
Mileage is where your business driving lives. Four cards across the top show Miles This Month, Miles for the tax year, your Mileage Deduction, and the Mileage Rate ($/mi) you're using. Underneath is a search box with filters, then a table of trips showing Date, Route, Purpose / Property, Miles and Deduction.
Why would I use it?
Every time you drive for work — showings, listing appointments, site visits, supply runs. Business driving is one of the largest deductions most agents and builders have, and the easiest one to forget.
Click the screenshot to enlargeTap the screenshot to enlarge
 Click to enlarge1234
- 1Start Trip
- 2Miles and deduction
- 3Mileage Rate ($/mi)
- 4Trip log
What should I do first?
Before you begin driving for business, tap Start Trip. To get started, only Date, Starting Odometer, and Starting Location are required. You can add your destination, ending odometer, business purpose, notes, and any remaining trip details before you finish and save the trip.
What can I ignore if I'm brand new?
The Mileage Rate box. It's already set to the current IRS standard rate, and you should leave it alone unless your accountant tells you otherwise.
How does it work?
- Start Trip begins a drive; finish it when you arrive and the trip is saved.
- Each saved trip shows its route, purpose and the deduction it earned.
- Connect a trip to a property using the All properties filter and the Purpose / Property column.
- The pencil icon on a row lets you correct a date, route, purpose or distance.
- CSV and Excel export your trip log for your accountant.
The Start Trip reminder
This friendly reminder appears when you open AgentTaxPackage™ because starting a business trip is one of the easiest things to forget. Its purpose is to help you remember to start tracking your mileage before you begin driving.
If you are not starting a business trip, simply close the reminder by clicking the X and continue using the application as normal.
If you do start a trip but later close the application before tapping Finish Trip, AgentTaxPackage™ will remind you to finish that trip each time you reopen the app. The reminder will continue until the trip is completed and saved.
Nothing is wrong when you see either reminder. They are not errors, warnings, or signs that something is wrong with your records. They are simply helpful reminders designed to prevent forgotten trips and protect your deductible business mileage.
If you're heading out for a business drive, tap Start Trip. If you're not, simply close the reminder and continue with your day.
The Finish Trip reminder
If a trip is still running, AgentTaxPackage™ reminds you to finish it. An open trip has no ending point, and a trip without an ending is a deduction you can't claim.
Forgotten trips are the single most common way agents lose mileage at tax time — this reminder exists to prevent exactly that.
Like the start reminder, it appears once. You won't be nagged.
You can finish the trip in a tap, or dismiss the reminder and handle it later. ATP is looking out for your deduction, not interrupting your day.
Both reminders are normal
Seeing either reminder is the app working exactly as designed. Nothing is broken and nothing is missing.
You can turn reminders on or off at any time under Settings → Tax Readiness Reminders.
Pro Tip
Start the trip before you pull away rather than after. A trip started at the curb is accurate; a trip reconstructed a week later is a guess.
Mileage Checklist PDF
What to capture for every business drive
Click the screenshot to enlargeTap the screenshot to enlarge
Click to enlarge1234- 1Start Trip
- 2Miles and deduction
- 3Mileage Rate ($/mi)
- 4Trip log
Income
What is this screen?
Income tracks commission by closing. Three cards show This Month, the year's Net Commission with a count of closings, and your Average Commission. Below them is a search box with property and date filters, and a table listing each closing with Client / Property, Gross, Split and Net.
Why would I use it?
When a commission or payment lands. Recording it as it arrives keeps your earnings and your spending in step with each other.
Click the screenshot to enlargeTap the screenshot to enlarge
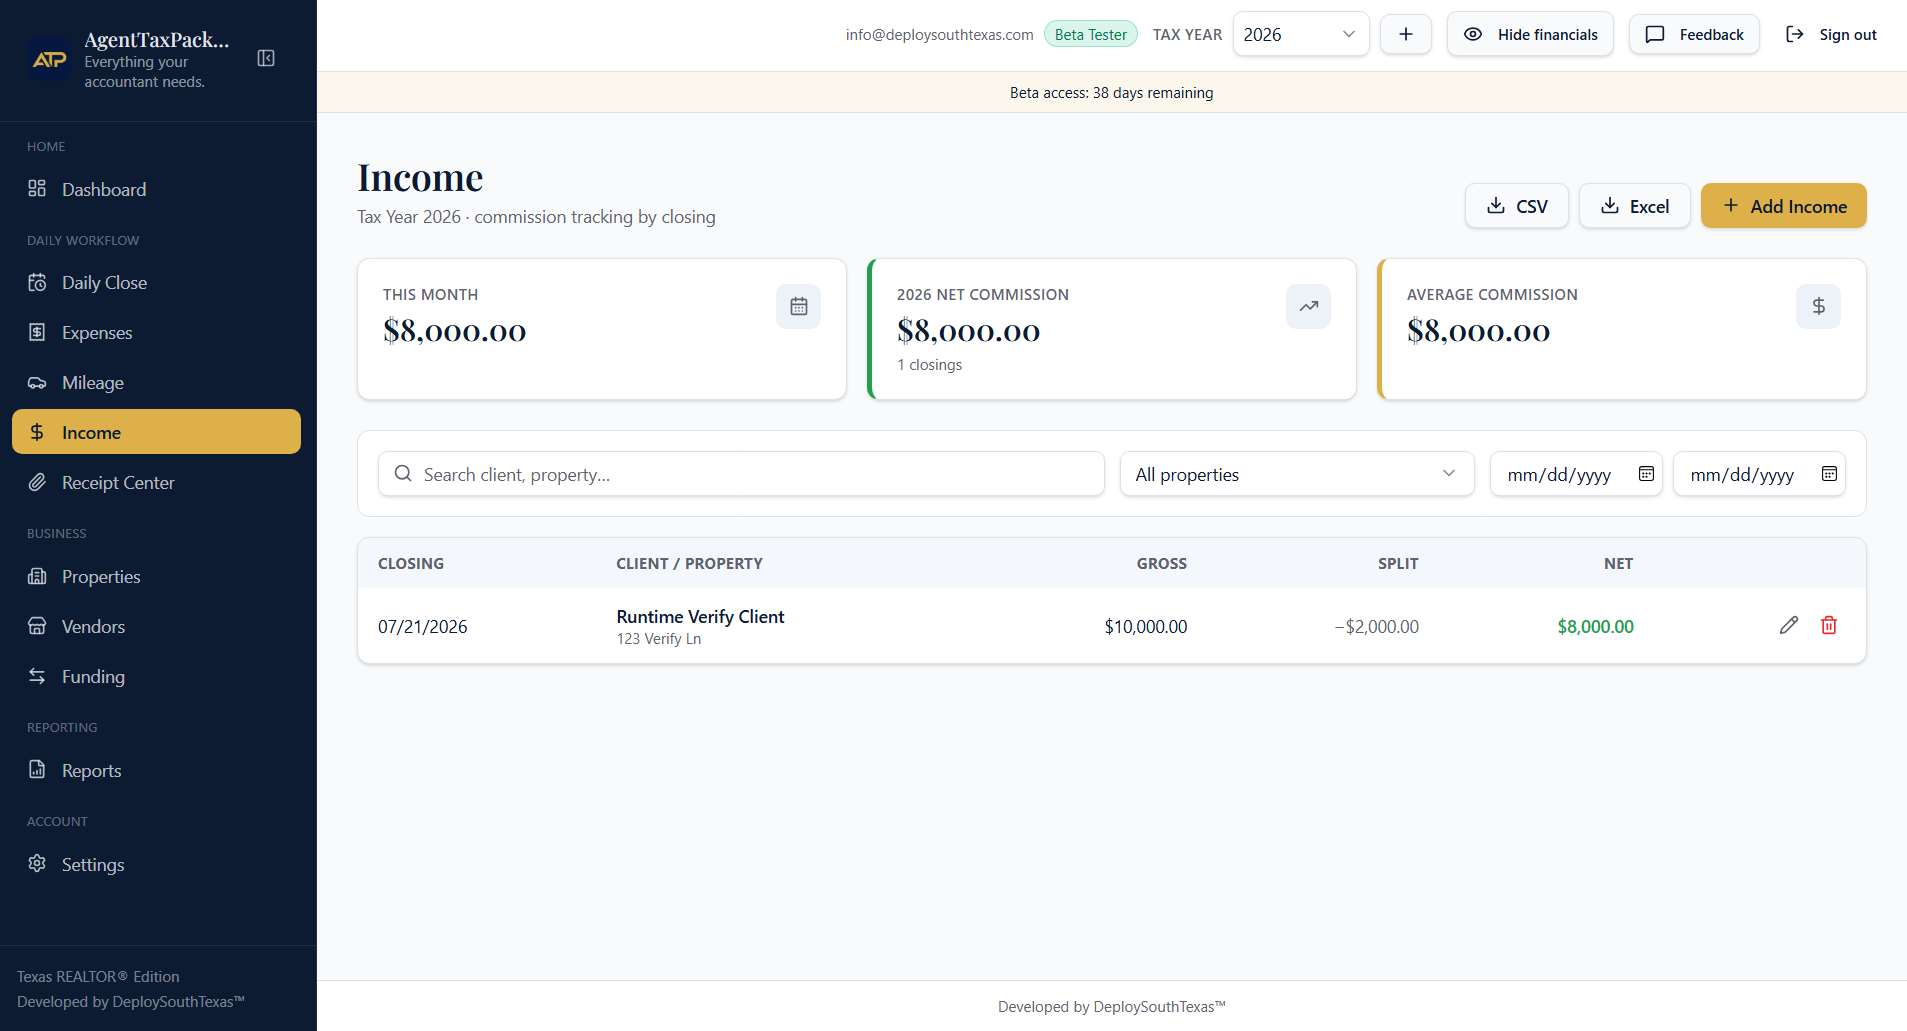 Click to enlarge123
- 1Add Income
- 2Commission summary
- 3Closings
What should I do first?
Press + Add Income and enter your most recent closing.
What can I ignore if I'm brand new?
The Average Commission card. With one closing recorded it just repeats your only number — it becomes useful after a few deals.
How does it work?
- + Add Income records a closing with its gross amount and split.
- The Net column is what's left after the split — that's the figure your reports use.
- Enter the client and the property so the closing shows up on the right property later.
- Search or filter by property and date range to find a past closing.
- The pencil icon edits a closing, the trash icon removes it, and CSV / Excel export the list.
Pro Tip
Record income the same day it clears. Matching real deposits to real entries makes every later review much faster.
Click the screenshot to enlargeTap the screenshot to enlarge
Click to enlarge123- 1Add Income
- 2Commission summary
- 3Closings
Receipt Center
What is this screen?
The Receipt Center is your receipt management dashboard. It gives you a complete picture of your business receipts by showing which expenses already have receipts attached, which expenses are still missing documentation, which receipts are not required, and any possible duplicate uploads. You can quickly search and filter receipts by vendor, category, property, tax year, filename, and date to locate the documentation you need. The Receipt Center also helps ensure your records are organized and ready for reporting throughout the year.
Why would I use it?
Use the Receipt Center to monitor the completeness of your business records. Instead of opening every expense individually, you can immediately see which expenses still need documentation, review attached receipts, and quickly locate specific files whenever you need them. Keeping your Receipt Center organized throughout the year makes tax season and accountant preparation significantly easier.
Click the screenshot to enlargeTap the screenshot to enlarge
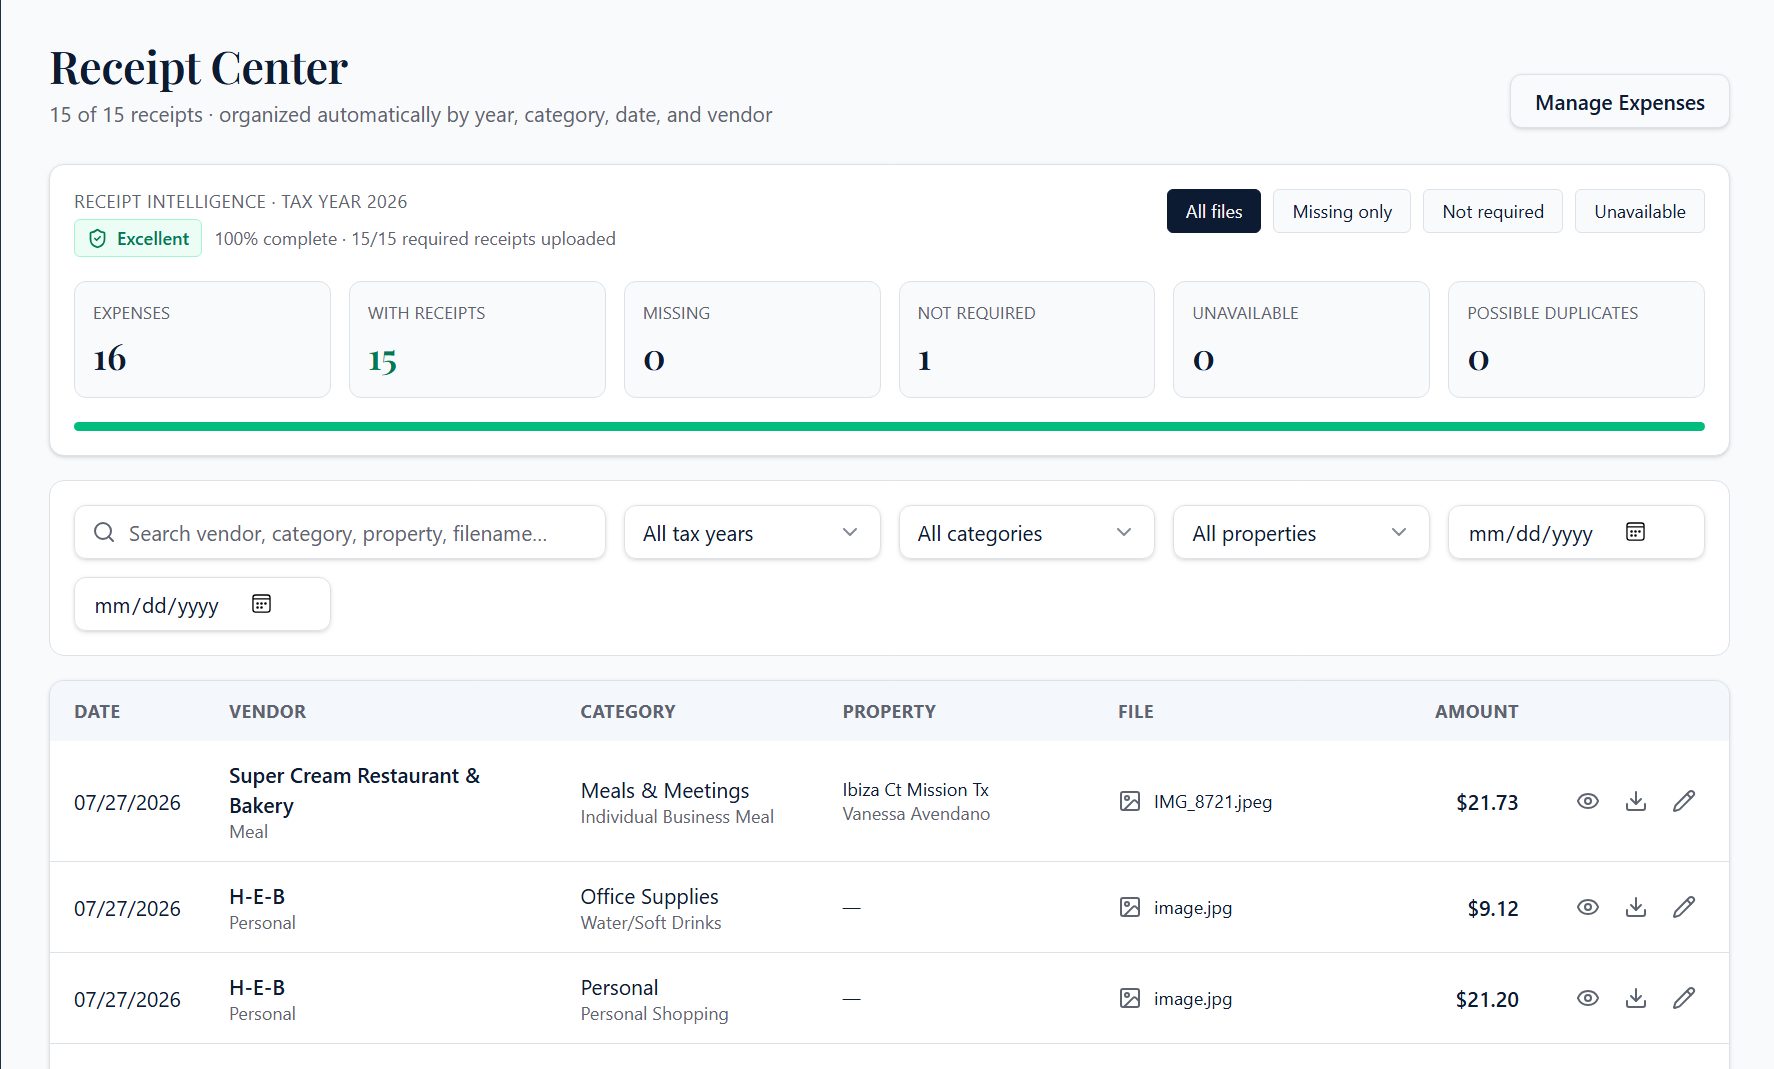 Click to enlarge
What should I do first?
Start by reviewing the Receipt Intelligence summary at the top of the page. It shows Total Expenses, Expenses With Receipts, Missing Receipts, Receipts Not Required, Unavailable Receipts, and Possible Duplicate Receipts. If any expenses are missing receipts, use the built-in filters to locate them and resolve them one at a time.
What can I ignore if I'm brand new?
Don't worry about making every number perfect immediately. Focus on attaching receipts to your current business expenses. The Receipt Center helps you monitor your progress over time, so you can gradually complete older records without feeling overwhelmed.
How does it work?
- Receipt Intelligence automatically tracks the status of your expense documentation.
- Every expense is categorized as having a receipt, missing a receipt, not requiring a receipt, or unavailable.
- Search and filter receipts by vendor, category, property, filename, tax year, or date.
- Use the status filters to focus on Missing, Not Required, or Unavailable receipts.
- Receipt Intelligence updates automatically as your records change.
Why this matters at tax time
One of the biggest advantages of AgentTaxPackage™ is what happens when you generate your reports.
When you create your Accountant Package or other export reports, ATP automatically organizes your receipt images into clearly labeled folders that match your expense categories.
For example: Insurance, Meals & Meetings, Office Supplies, Advertising, Professional Services, Vehicle Expenses.
Instead of handing your accountant hundreds of individual receipt files, your documentation is already grouped and organized by category, making it faster to review and much easier to navigate.
Pro Tip
Attach receipts throughout the year instead of waiting until tax season. Keeping your Receipt Center up to date means your reports and Accountant Package are already organized when it's time to prepare your taxes.
Receipt Checklist PDF
What a good receipt photo includes
Click the screenshot to enlargeTap the screenshot to enlarge
Click to enlargeProperties / Projects
What is this screen?
Properties / Projects tracks income and expenses per property or project. There's a small Add Property / Project box at the top, then a table showing each property with its Income, Expenses, Mileage and Net Profit. Three built-in entries — General Business, Buyer Representation and Listing Marketing — are there from day one and are marked BUILT-IN.
Why would I use it?
When you take on a listing, a build, or any project where you want to know what it cost and what it returned.
Click the screenshot to enlargeTap the screenshot to enlarge
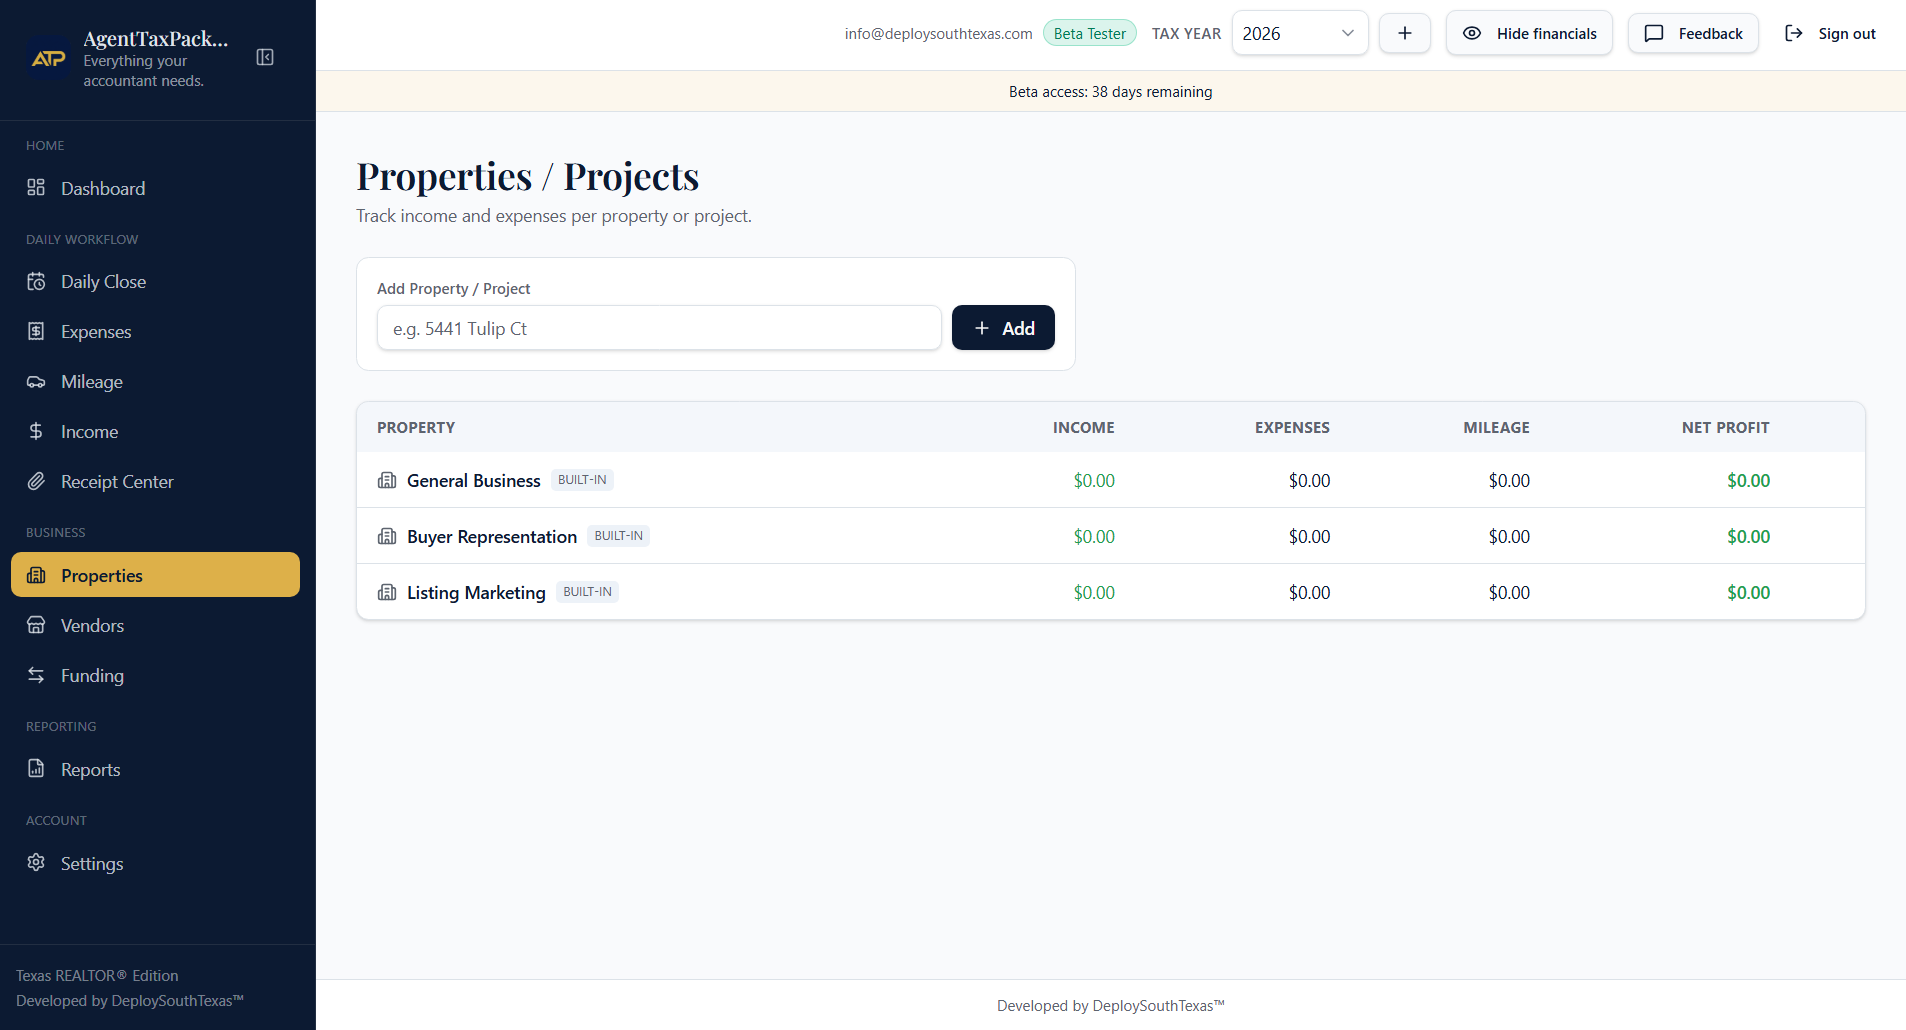 Click to enlarge123
- 1Add Property / Project
- 2Built-in categories
- 3Net Profit per property
What should I do first?
Type an address in the Add Property / Project box — for example 5441 Tulip Ct — and press + Add.
What can I ignore if I'm brand new?
The three BUILT-IN rows. They're catch-alls for work that isn't tied to a single address, and you can leave them at $0.00.
How does it work?
- Add a property once with an address or name you'll recognize.
- Connect expenses, income and trips to it as you record them.
- The table adds everything up into Net Profit for each property.
- Reports has a matching Property Profitability section using the same numbers.
Pro Tip
Create the property before the spending starts. Connecting entries as you go is effortless; sorting them afterward is not.
Click the screenshot to enlargeTap the screenshot to enlarge
Click to enlarge123- 1Add Property / Project
- 2Built-in categories
- 3Net Profit per property
Vendors
What is this screen?
Vendors is your list of the people and businesses you pay — photographers, drone pilots, TCs, bookkeepers and more. The table shows each Vendor, their Service, Contact, what you've Paid this tax year and an All-Time total. Before you add anyone it simply says No vendors yet.
Why would I use it?
When you find yourself typing the same name over and over on expenses. Save it once as a vendor instead.
Click the screenshot to enlargeTap the screenshot to enlarge
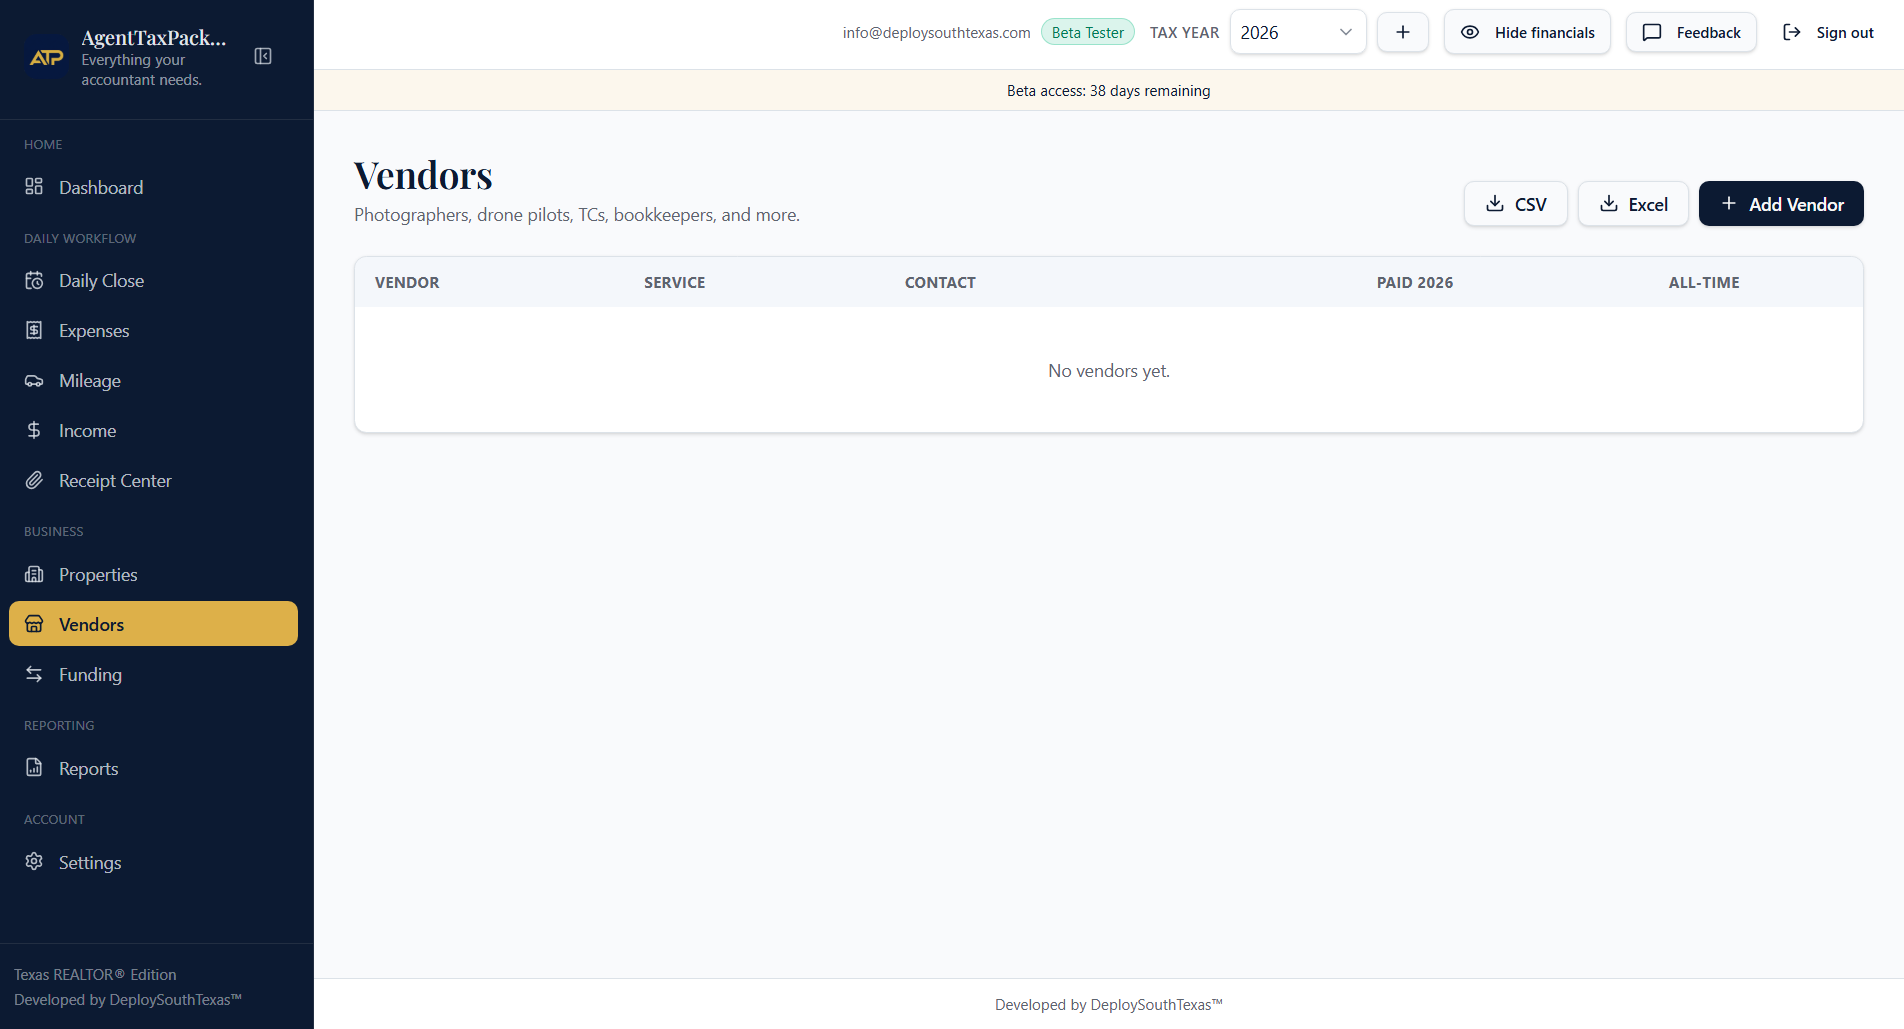 Click to enlarge12
- 1Add Vendor
- 2Vendor list
What should I do first?
Press + Add Vendor and save the one person you pay most often.
What can I ignore if I'm brand new?
The All-Time column. It only becomes interesting after a year or two of history.
How does it work?
- + Add Vendor saves a name, the service they provide and their contact details.
- Select that vendor when recording an expense instead of retyping the name.
- Paid and All-Time totals fill in automatically from your expenses.
- CSV and Excel export your vendor list.
Pro Tip
Pick one spelling per vendor and stick with it. One clean vendor beats three near-identical ones at year-end.
Click the screenshot to enlargeTap the screenshot to enlarge
Click to enlarge12- 1Add Vendor
- 2Vendor list
Funding & Transfers
What is this screen?
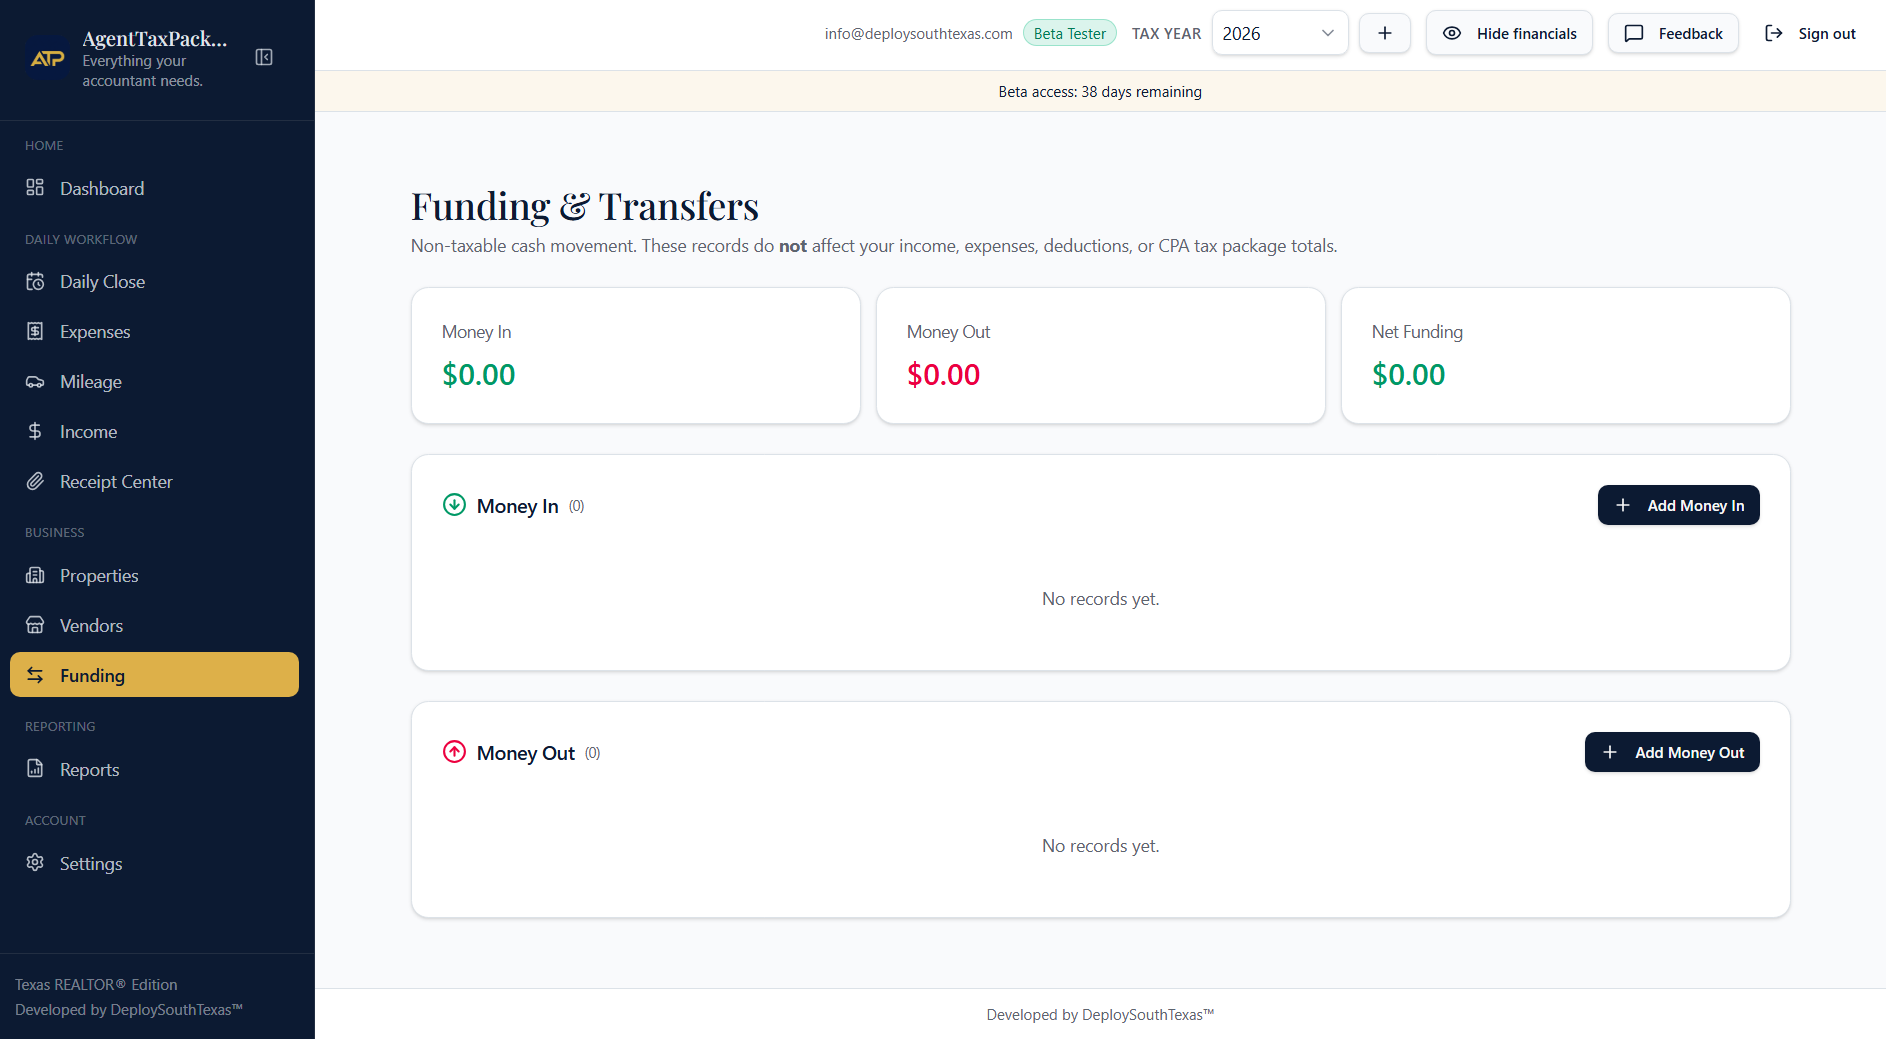
Funding & Transfers records non-taxable cash movement. As the screen says, these records do not affect your income, expenses, deductions or CPA tax package totals. Three cards show Money In, Money Out and Net Funding, and below them are two lists — Money In and Money Out — each with its own add button.
Why would I use it?
When you move personal money into the business, or move money back out, and it isn't something you earned or spent on the business.
Click the screenshot to enlargeTap the screenshot to enlarge
 Click to enlarge123
- 1Money In / Out / Net Funding
- 2Money In records
- 3Money Out records
What should I do first?
Only use this screen if you've actually moved money in or out. If you haven't, leave it empty.
What can I ignore if I'm brand new?
This whole screen, honestly, if you're brand new. It exists so transfers don't get mistaken for income — most people don't touch it in week one.
How does it work?
- + Add Money In records cash you put into the business.
- + Add Money Out records cash you take back out.
- Net Funding is simply Money In minus Money Out.
- Nothing here changes your deductions or your tax package — it's cash-flow only.
Pro Tip
Keeping funding and income apart is one of the most valuable habits here. Your accountant treats the two very differently.
Click the screenshot to enlargeTap the screenshot to enlarge
Click to enlarge123- 1Money In / Out / Net Funding
- 2Money In records
- 3Money Out records
Reports
What is this screen?
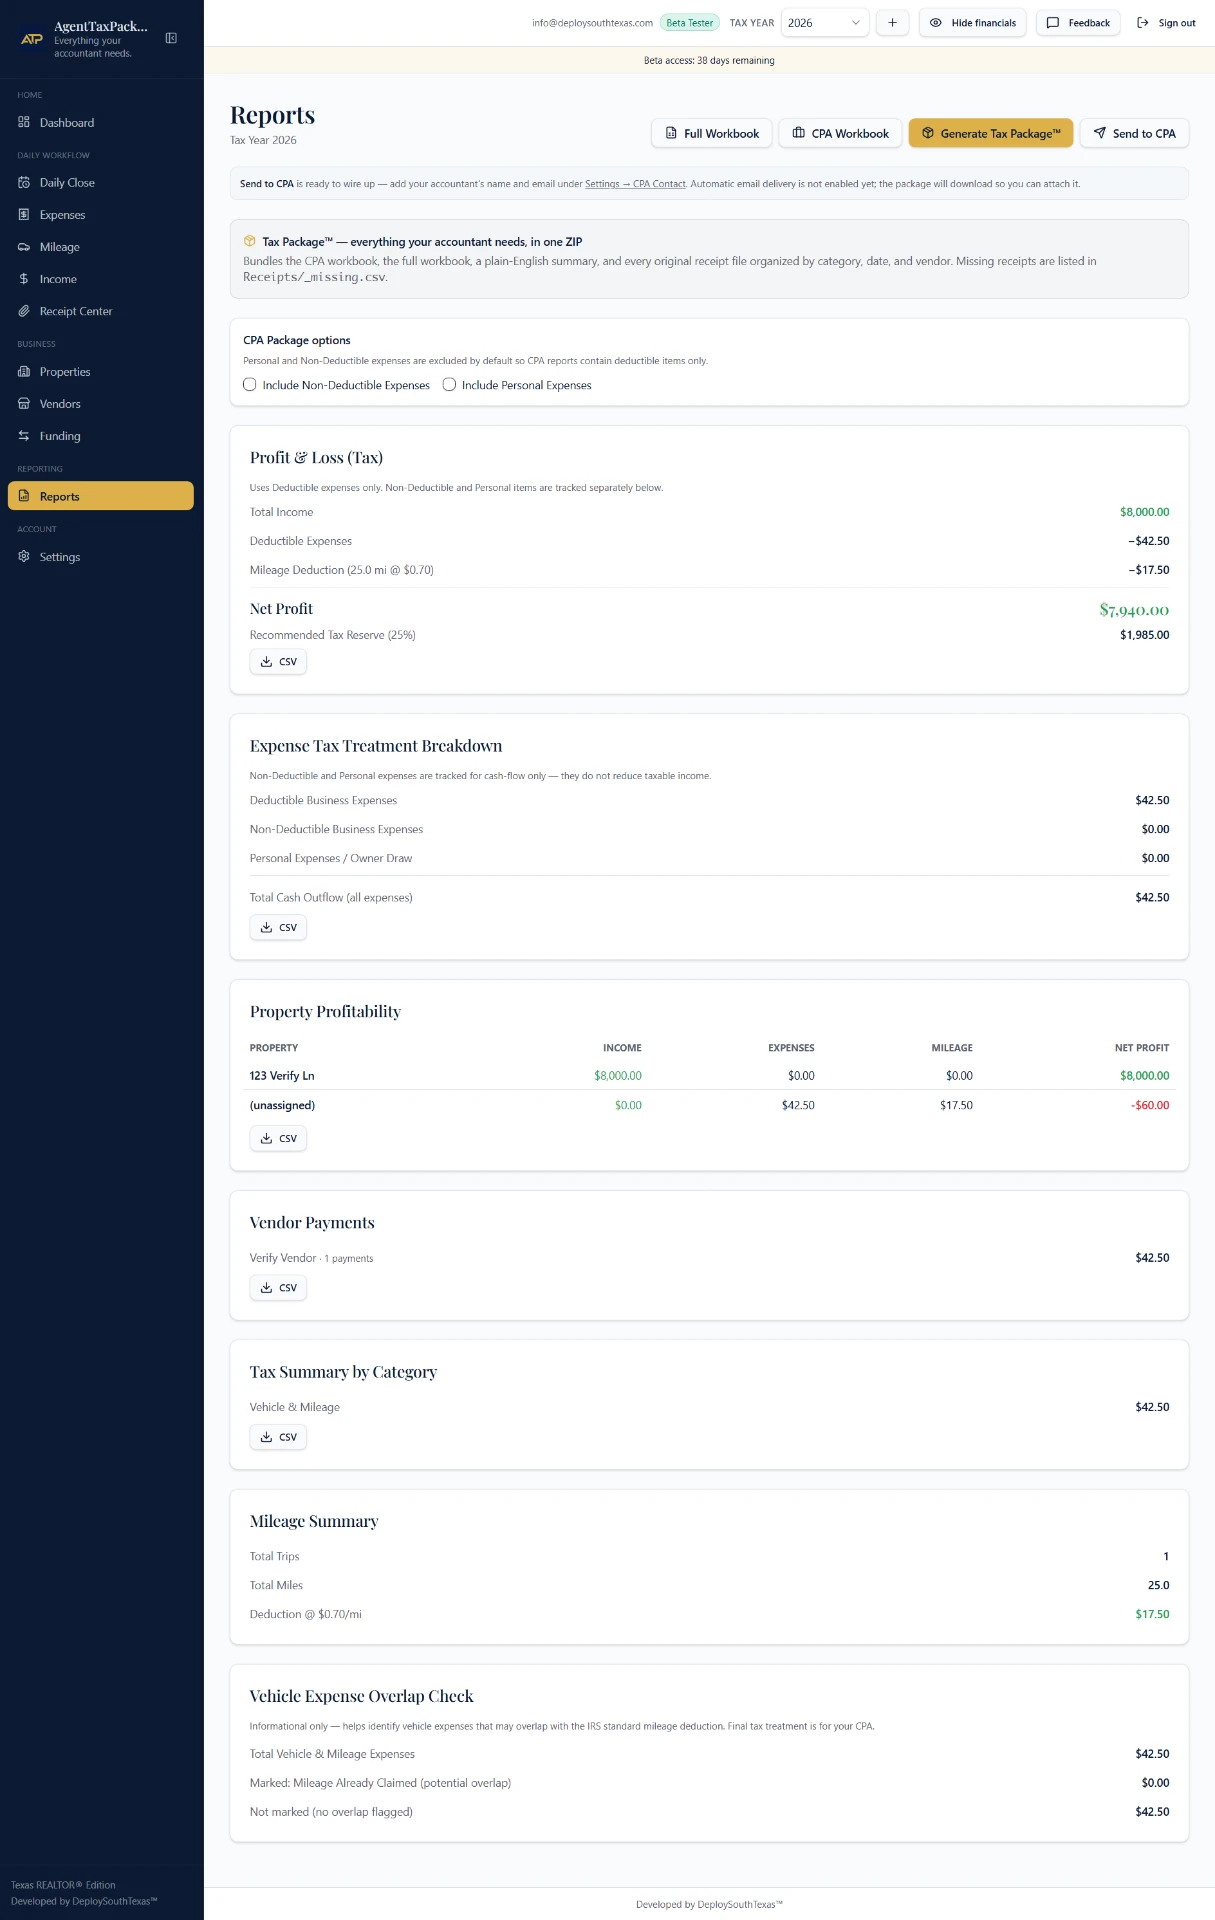
Reports turns everything you've recorded into summaries you can read or hand to your accountant. Along the top are Full Workbook, CPA Workbook, Generate Tax Package™ and Send to CPA. Below are the sections: Profit & Loss (Tax), Expense Tax Treatment Breakdown, Property Profitability, Vendor Payments, Tax Summary by Category, Mileage Summary and Vehicle Expense Overlap Check. Each has its own CSV button.
Why would I use it?
At a quarterly check-in, at year-end, or any time you need to know how the business is actually doing.
Click the screenshot to enlargeTap the screenshot to enlarge
 Click to enlarge1234
- 1Generate Tax Package™
- 2What's in the ZIP
- 3Profit & Loss (Tax)
- 4Property Profitability
What should I do first?
Scroll to Profit & Loss (Tax) and read the three lines: Total Income, Deductible Expenses and Mileage Deduction.
What can I ignore if I'm brand new?
Vehicle Expense Overlap Check and the CPA Package options checkboxes. The screen says it plainly — final tax treatment is for your CPA.
How does it work?
- Generate Tax Package™ bundles the CPA workbook, a plain-English summary and every original receipt file into one ZIP, organized by category, date and vendor.
- Anything without a receipt is listed for you in Receipts/_missing.csv inside that ZIP.
- Full Workbook and CPA Workbook download spreadsheet versions.
- CSV under any section exports just that section.
- Send to CPA needs your accountant's name and email saved under Settings → CPA Contact first.
Pro Tip
Run a report once a quarter rather than once a year. Small gaps are easy to fix in April; they're painful to fix the following February.
Year-End Checklist PDF
Everything to review before you file
Click the screenshot to enlargeTap the screenshot to enlarge
Click to enlarge1234- 1Generate Tax Package™
- 2What's in the ZIP
- 3Profit & Loss (Tax)
- 4Property Profitability
Settings
What is this screen?
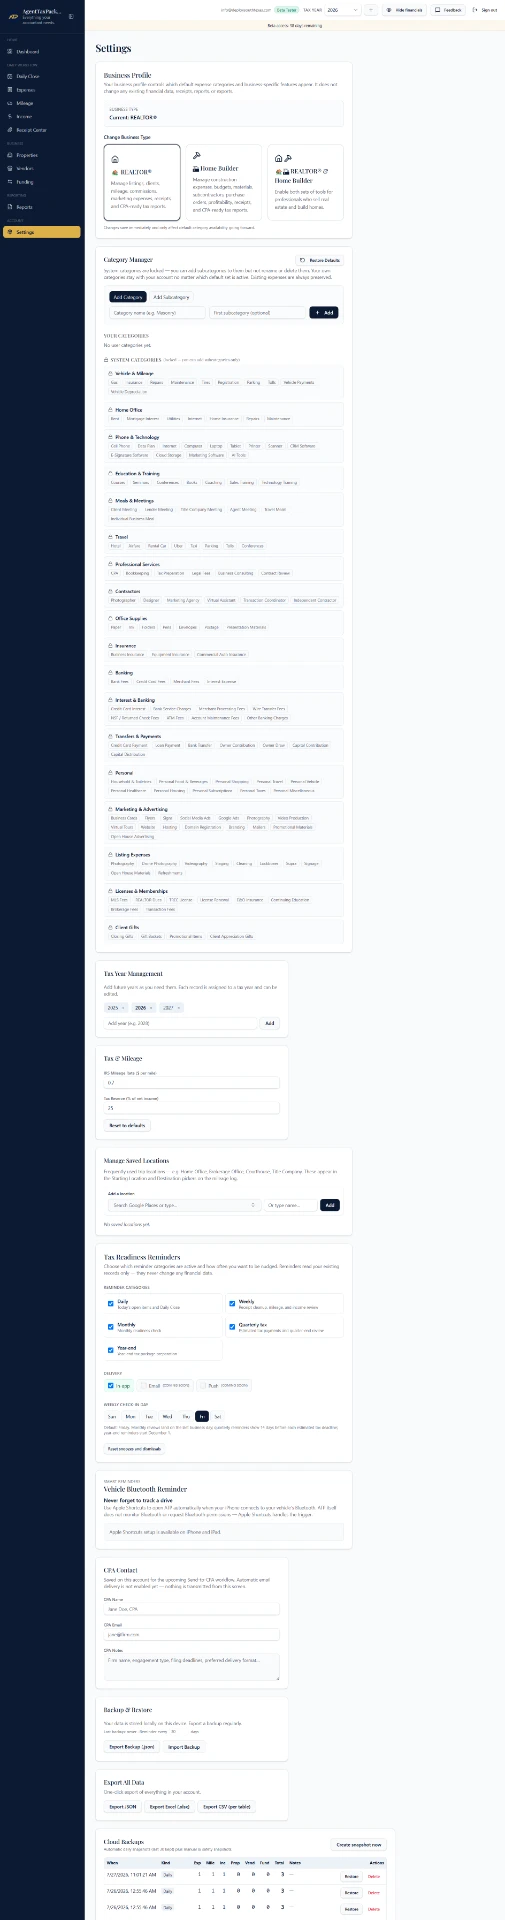
Settings is one long page of everything you can configure: Business Profile and Change Business Type (REALTOR®, Home Builder, or both), the Category Manager with all the system categories, Tax Year Management, Tax & Mileage rates, Manage Saved Locations, Tax Readiness Reminders, the Vehicle Bluetooth Reminder, CPA Contact, Backup & Restore, Export All Data and Cloud Backups.
Why would I use it?
On your first day, and then only occasionally when something about your business changes.
Click the screenshot to enlargeTap the screenshot to enlarge
 Click to enlarge12345
- 1Business Profile
- 2Category Manager
- 3Tax & Mileage
- 4Tax Readiness Reminders
- 5CPA Contact
What should I do first?
Confirm your Business Type at the top. Everything else on this page already has a sensible default.
What can I ignore if I'm brand new?
The Category Manager. Every system category you need is already there — you only come back here if you want to add one of your own.
How does it work?
- Change Business Type switches the app between REALTOR®, Home Builder, and both.
- Tax & Mileage holds the IRS mileage rate and your tax reserve percentage.
- Tax Readiness Reminders is where Daily, Weekly, Monthly, Quarterly and Year-end nudges are switched on or off, including the mileage reminders.
- CPA Contact stores your accountant's name and email for Send to CPA in Reports.
- Backup & Restore, Export All Data and Cloud Backups keep a copy of everything you've entered.
Pro Tip
Spend five minutes here before you record anything else. Correct settings up front save you from correcting entries later.
Click the screenshot to enlargeTap the screenshot to enlarge
Click to enlarge12345- 1Business Profile
- 2Category Manager
- 3Tax & Mileage
- 4Tax Readiness Reminders
- 5CPA Contact